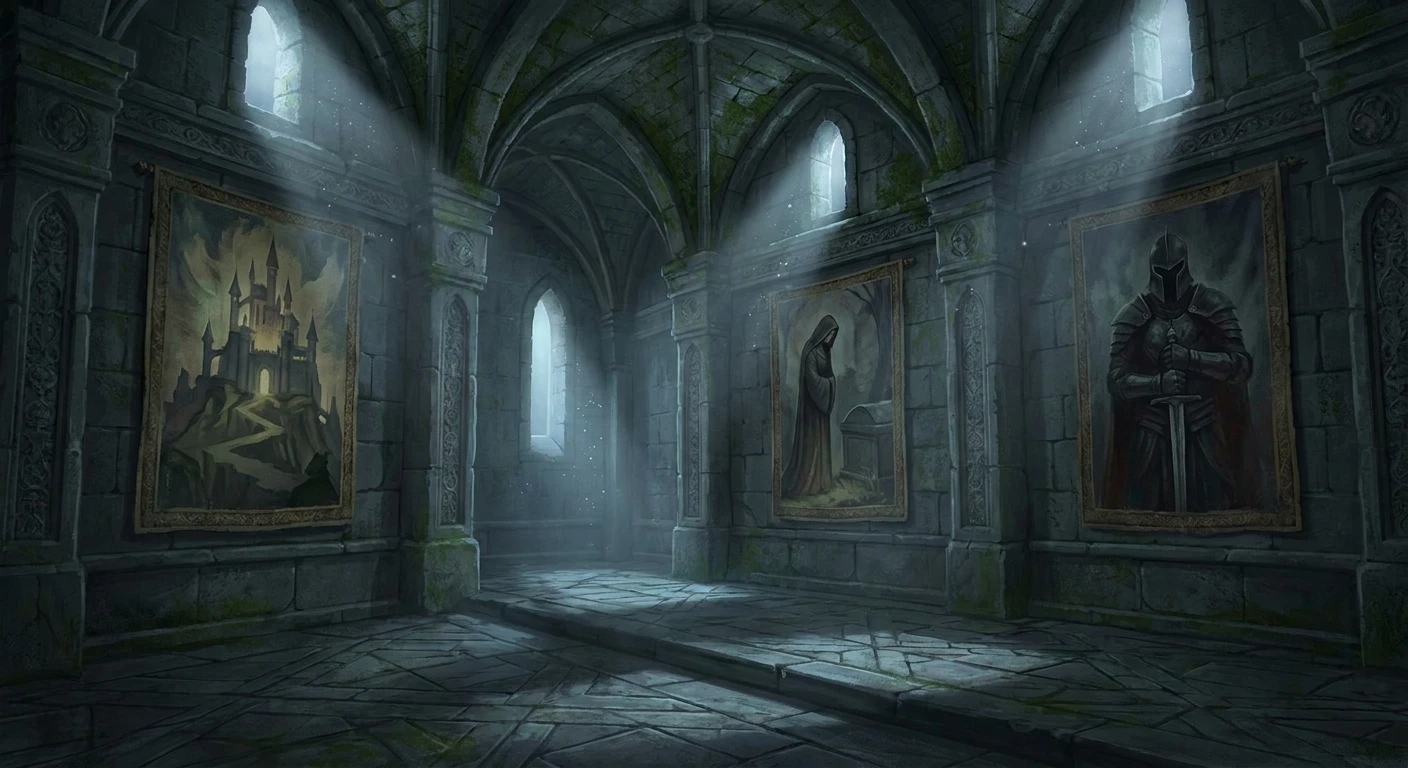
Decoding the BG3 Mausoleum Puzzle
Solving the BG3 Mausoleum Puzzle is a mandatory checkpoint for adventurers traversing the desolate Shadow-Cursed Lands during Act 2 of Baldur’s Gate 3. Situated at the northern edge of Reithwin Town, the Thorm Mausoleum stands as a solemn monument to grief, betrayal, and dark magic. Unlocking its secrets is absolutely essential if you want to access the Gauntlet of Shar, progress Shadowheart’s companion quest, and eventually confront General Ketheric Thorm. The puzzle itself acts as a massive mechanical lock guarding the deeper catacombs, relying on environmental storytelling and environmental hazards rather than combat.
Navigating this space requires patience and observation. The room is heavily booby-trapped with pressure plates and magical vents designed to unleash blinding darkness and severe necrotic damage upon trespassers. Understanding the underlying lore of Ketheric Thorm’s tragic life is the key to bypassing these defenses. The narrative directly informs the gameplay mechanics here. By paying close attention to the environmental clues, specifically a battered diary left behind by a previous grave robber, players can piece together the sequence required to open the hidden passageway without turning their party into permanent residents of the cemetery.
Read also: Survive the blood stained shrine Today; Master the Chamber of Insight BG3 Puzzle Fast.
Core Mechanics and Survival Strategies
The fundamental challenge of the puzzle revolves around pressing three specific buttons located beneath three large murals in the correct chronological order of Ketheric Thorm’s life. Failing to enter the correct sequence instantly triggers a room-wide trap system. Darkness spells blanket the area, blinding the party, while vents spew necrotic gas that rapidly drains hit points. Surviving this encounter means understanding how to manipulate your party’s positioning and interacting safely with the environment.
Proper preparation yields distinct advantages when tackling this chamber. First, you avoid unnecessary resource depletion; wasting health potions and spell slots on avoidable trap damage is a critical error in tactician or honor mode. Second, successfully navigating the puzzle without triggering the traps keeps your party in optimal condition for the grueling encounters waiting below in the Gauntlet of Shar. Third, it provides an immediate narrative reward, validating the player’s attention to the game’s rich lore.
Consider the following value propositions when approaching the chamber strategically:
- Resource Conservation: Avoid spending short rests to heal necrotic damage.
- Narrative Immersion: Engaging with the lore makes the puzzle feel earned rather than arbitrarily bypassed.
| Painting Name | Location in Chamber | Correct Sequence Order |
|---|---|---|
| Moonrise Towers | Left wall (upon entering) | First (Represents his glorious past) |
| Grief | Right wall (upon entering) | Second (Represents his tragic loss) |
| General | Back wall (center) | Third (Represents his current ruthless state) |
To execute the solution perfectly, follow this exact preparation sequence:
- Halt your party at the entrance of the mural room to prevent companion AI from wandering onto pressure plates.
- Select your character with the highest Perception and Sleight of Hand skills (typically a Rogue or Ranger) to enter alone.
- Locate and read the Stained Book located on the right side of the room to confirm the lore clue: “Splendor, Tragedy, Infamy.”
- Disarm the gargoyle traps and vent covers scattered across the floor before attempting to press any buttons.
History and Origins of the Thorm Family Tomb
Origins of the Mausoleum
The Thorm Mausoleum was originally constructed as a majestic resting place for Ketheric Thorm’s beloved wife, Melodia. In the days before the Shadow Curse, Reithwin Town was a prosperous settlement dedicated to Selûne, the Moonmaiden. The architecture of the upper tomb reflects this earlier era of splendor, characterized by intricate stonework and grand monuments that celebrated life and light. Ketheric, once a devoted paladin of Selûne, poured his immense wealth and political power into creating a monument that would stand the test of time, ensuring his family’s legacy would never be forgotten by the citizens of the region.
Evolution of Dark Influence
Following the sudden and tragic death of his wife, and later his daughter Isobel, Ketheric’s grief twisted into an unbearable obsession. He abandoned the light of Selûne and turned to Shar, the Nightsinger, goddess of darkness and loss. The mausoleum evolved in tandem with his descent into madness. Secret passages were carved beneath the marble floors, leading down into a massive underground complex that would eventually become the Gauntlet of Shar. The once-peaceful tomb was heavily modified with lethal traps, mechanical locks, and magical wards designed to punish anyone who dared to disturb his family’s eternal rest or uncover his dark new allegiances.
Modern State in the Shadow-Cursed Lands
In its current state during Act 2 of Baldur’s Gate 3, the mausoleum is a decaying, hostile environment. The Shadow Curse has seeped into the very stone of the building. The intricate puzzle guarding the lower levels is a direct reflection of Ketheric’s fractured psyche. The sequence of the paintings—moving from his days of splendor to his ultimate infamy—serves as a twisted historical record that he forces intruders to acknowledge before granting them passage. It remains one of the few completely intact structures in the region, preserved by powerful necrotic magic.
Technical Deep Dive: Trap Mechanics and Engine Logic
Understanding Trigger Hitboxes and AI Pathing
From a technical gameplay perspective, the puzzle room is a masterclass in Larian Studios’ Divinity 4.0 engine environmental design. The floor of the chamber is laced with overlapping trigger hitboxes connected to hidden pressure plates. When a character’s collision mesh intersects with these invisible plates, it sends a script call to the room’s trap system. Because companion AI in Baldur’s Gate 3 attempts to follow the player character using dynamic pathfinding, a trailing companion will frequently step on these plates if the party is not manually un-grouped. The traps operate on a boolean logic system: if the buttons beneath the paintings are pressed out of the designated array order [1, 2, 3], the trap sequence is immediately executed.
Saving Throws and Necrotic Damage Scaling
When the trap triggers, the engine deploys two simultaneous environmental hazards. First, a localized Darkness effect is spawned, breaking line of sight and blinding characters, which prevents targeted spells or ranged attacks to disarm mechanisms from afar. Second, invisible emitters cast a persistent area-of-effect necrotic damage zone. Characters caught in this zone must repeatedly make Constitution saving throws.
- Perception Check DC: Base Difficulty Class to spot the gargoyle traps and vents is generally 14, requiring characters with high Wisdom.
- Disarm DC: Using Thieves’ Tools to disable the vents requires a Sleight of Hand check against a DC of 14.
- Damage Type: The traps inflict raw Necrotic damage, which ignores standard physical resistances.
- Reset Protocol: The puzzle sequence resets automatically after a failed attempt, allowing infinite retries if the party survives the trap damage.
- Blindness Effect: The magical darkness cannot be dispelled by standard low-level light cantrips; it requires leaving the area or specific magical counters.
Actionable Plan: Step-by-Step Walkthrough
Step 1: Halt at the Chamber Entrance
As you enter the final room of the upper mausoleum, immediately press the ‘Ungroup’ key (default ‘G’ on keyboard). Keep your three companions waiting securely in the hallway. This prevents their automatic pathing from wandering over the numerous hidden pressure plates scattered across the marble floor.
Step 2: Select Your Trap Specialist
Take control of the character with the highest Perception and Sleight of Hand skills. Astarion is an excellent choice for this role. Cast Guidance on this character if you have a Cleric in your party, as it will significantly boost their chances of passing the passive Perception checks needed to spot the floor traps.
Step 3: Disarm the Floor Vents
Carefully navigate the room, pausing frequently to allow the game to roll passive Perception checks. As the gargoyle heads and floor vents glow red, approach them cautiously. Use Thieves’ Tools to disarm every trap you can find. This creates a safe walking path between the three paintings.
Step 4: Locate the Stained Book Clue
Walk to the eastern (right-hand) side of the room. You will find a skeleton and a “Stained Book.” Read the book. The text details a specific phrase: “From splendor, to tragedy, to infamy.” This phrase is the definitive cipher for the button sequence.
Step 5: Press the Moonrise Towers Button
Walk to the painting located on the western (left-hand) wall upon entering. The plaque identifies it as “Moonrise Towers.” This represents the “splendor” mentioned in the diary, depicting Ketheric’s grand fortress before the curse. Press the button located beneath the plaque. You will hear a mechanical click.
Step 6: Press the Grief Button
Navigate safely to the painting on the eastern (right-hand) wall. The plaque reads “Grief.” This image represents the “tragedy” of losing his wife and daughter. Press the button beneath this painting. A second mechanical click will confirm the input.
Step 7: Press the General Button
Move to the massive painting situated on the northern (back) wall of the chamber. The plaque identifies it as “General.” This signifies his current “infamy” as the undying commander of the Absolute’s forces. Pressing this final button completes the sequence, causing the rear walls to slide open and reveal the platform leading to the Gauntlet of Shar.
Myths and Reality of the Encounter
Myth: You must defeat a powerful undead boss inside the puzzle room to proceed.
Reality: The puzzle room itself contains no enemies or boss fights. The only danger comes entirely from the environmental traps. The undead encounters happen in the graveyard outside and deeper within the Gauntlet.
Myth: Any button combination will eventually work if you press them fast enough.
Reality: The order is strictly hardcoded by the game’s script. Inputting any incorrect sequence immediately voids the attempt and triggers the trap system, regardless of your speed.
Myth: You need a character with extremely high Intelligence to decode the puzzle.
Reality: There are no Intelligence stat checks required to understand the puzzle. The solution is explicitly written in plain text within the Stained Book found in the room.
Myth: Failing the puzzle permanently locks the door to the Gauntlet of Shar.
Reality: The mechanism is designed to reset. If you input the wrong code and trigger the traps, wait for the magical darkness to dissipate, and you can try the sequence again from the beginning.
Frequently Asked Questions & Conclusion
What is the correct painting order?
The correct chronological order to press the buttons is: Moonrise Towers (Left), Grief (Right), and finally General (Back Center).
Where is the clue for the sequence located?
The definitive clue is found in a “Stained Book” lying on the floor near a skeleton on the right side of the puzzle chamber.
Can I bypass the puzzle completely using magic?
No, the hidden doors are magically sealed and cannot be bypassed by standard Knock spells, misty step exploits, or physical destruction. The sequence must be completed.
What exactly happens if I press the wrong button?
The room immediately fills with magical Darkness that blinds your party, while vents release a gas that deals heavy Necrotic damage every turn you remain inside the cloud.
How do I stop my party from triggering traps?
You must ungroup your party before entering the chamber. Leave three party members in the safe hallway and control a single character to navigate the room.
Does the puzzle require a specific companion to be present?
No specific companion is mechanically required to solve it. However, having Shadowheart in your party provides unique dialogue and significant lore context, as the path leads to her goddess’s domain.
What lies beyond the hidden door once opened?
Opening the door reveals a magical traversal gem on an elevator platform. This platform descends deep into the earth, transporting you directly into the Gauntlet of Shar.
Can I cast spells to reveal the hidden buttons?
The buttons are not hidden by illusion magic; they are physically present beneath the paintings. Spells like See Invisibility are not required to find or interact with them.
Successfully navigating the BG3 Mausoleum Puzzle requires a blend of situational awareness, lore comprehension, and careful party management. By understanding Ketheric Thorm’s tragic timeline, you can easily bypass the lethal traps and continue your journey into the darkness below. Don’t let a few pressure plates end your honor mode run prematurely. Group your party securely, follow the sequence detailed above, and prepare yourself for the massive challenges waiting in the Gauntlet of Shar.



Leave a Reply